Shopify Purchase Order: All You Need to Know
A successful Shopify store relies not just on having the best products and marketing strategies. Getting your products in stock at all times is another crucial point. And it requires an efficient order management process.
For that reason, we'll help you have a better understanding of Shopify purchase orders in this article. We'll also cover the proper way to use it.
Without further ado, let's get started.
What is a Shopify Purchase Order?
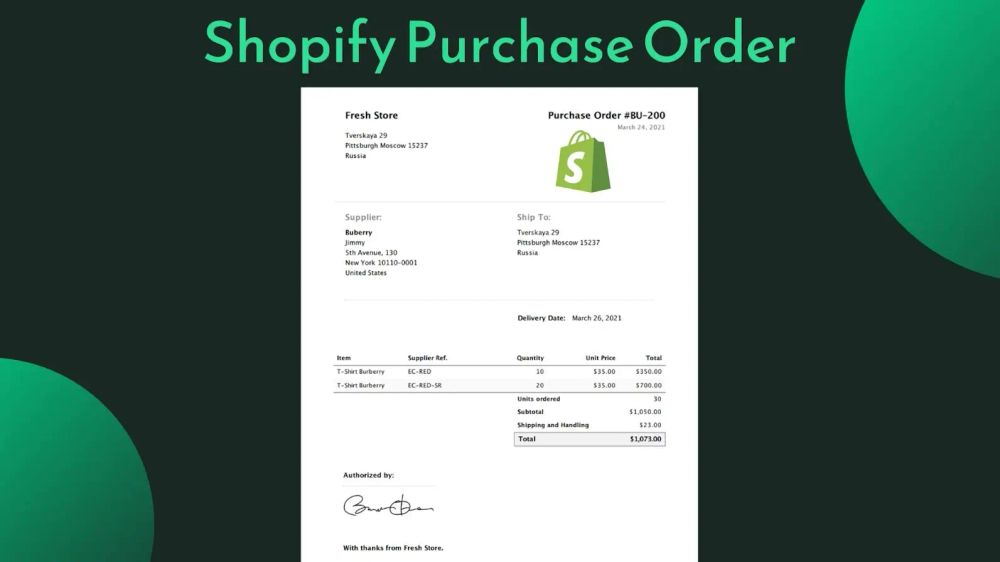
A purchase order is a legal document that Shopify store owners send to merchants to record the sale of products to be delivered later.
This allows you to place orders with suppliers without immediate payment. Merchants use purchase orders to provide buyers with risk-free credit, since buyers are legally obligated to pay for products once they have been delivered.
Once accepted by a supplier, the purchase order becomes a legally binding contract.
If there isn't an existing contract governing the relationship between you and the seller, the order cannot be fulfilled. Therefore, this provides legal protection for both parties.
When to Use Purchase Orders for Shopify Stores?
There are many times you should use purchase orders. For example, when you want:
- Better accuracy in inventory and financial management through better document keeping.
- Improve budget as funds must be available before issuing a purchase order.
- Faster delivery because purchase orders help schedule it.
- Improve account payable processes and enforce 2- or 3-party matching compliance.
That said, there are some downsides, too:
- For smaller purchases, it adds extra paperwork.
- From a financial point of view, credit cards can serve the same purpose.
The Process of Using a Purchase Order for Shopify Stores
Purchase orders are used to simplify the obtaining supply process, which looks somewhat like this:
- You decide to buy something for your Shopify store.
- You issue a purchase order to the merchant, either on paper or an electronic ordering system.
- The merchant receives the purchase order and confirms that their company can fulfill it. If they can't, they'll notify you and request a change. If the change can't be made, the purchase order is canceled so that you can find another supplier that meets your needs.
- If the order can be filled, the merchant prepares the order by pulling the needed inventory.
- The order is shipped. The purchase order number is listed on the picking slip. Therefore, both parties can easily track which order has arrived.
- The merchant sends invoice templates with a unique invoice number, including the purchase order number, to match the shipping information.
- You pay the invoice based on the agreement the two parties agreed to at the beginning of the association.
Use the Free Purchase Order Template by Shopify
You can track and sync orders manually and use a simple template to create purchase orders if you own a small Shopify store. Fortunately, Shopify's free purchase order template does just that. It's formatted to have all the information you need.
Follow the instructions below to get started:
- Go to this web page of Shopify.
- Scroll down to the Browse purchase orders by industry section and pick one that suits your Shopify store. This step is optional.

3. Enter the required information into the form.
4. Click Submit.

5. Wait for the email from Shopify to arrive in your inbox.
6. Click on the Get Your Order Now link.
7. Click Download PDF.
You can now print the copy or send it electronically to the merchant.
Use the Official Shopify App to Process Purchase Orders
It makes the most sense to invest in an electronic ordering system to streamline the purchase order process if you own a big Shopify store.
This eliminates the need to rely on paper forms that get lost easily. Besides, tracking and synchronizing ordered products with inventory can often be a time-consuming task, especially when you're dealing with numerous suppliers across different currencies and geographies.
You can benefit from a purchase order system even if you have a small Shopify store. It gives you a centralized place to keep track of what you're buying, who you're buying it from, and when you're buying it.
Putting a system in place when your store is in its infancy makes it easy to scale systems and processes as the store grows.
There's an official app from Shopify called Stocky. It's available to stores that have enabled Point of Sale and use Shopify POS Pro for at least one location.
Create a Purchase Order using Stocky
You can easily place and manage all of your purchase orders right from the Stocky app. To access its dashboard, go to Apps > Stocky Inventory Management from the Shopify dashboard.

The dashboard gives you a clear view of what's coming in and when it's coming in across all of your suppliers.

It also clearly lets you know when inventory is running low, where you're losing revenue, and what your best-selling products are.
Based on this information, you can easily create a purchase order and order more stock before running out.
To create a new purchase order:
- Click on the + Purchase Order button.

2. Select between a vendor or supplier. A supplier is a group of vendors. Therefore, if you want to create a purchase order for multiple vendors, you must first create a new supplier.
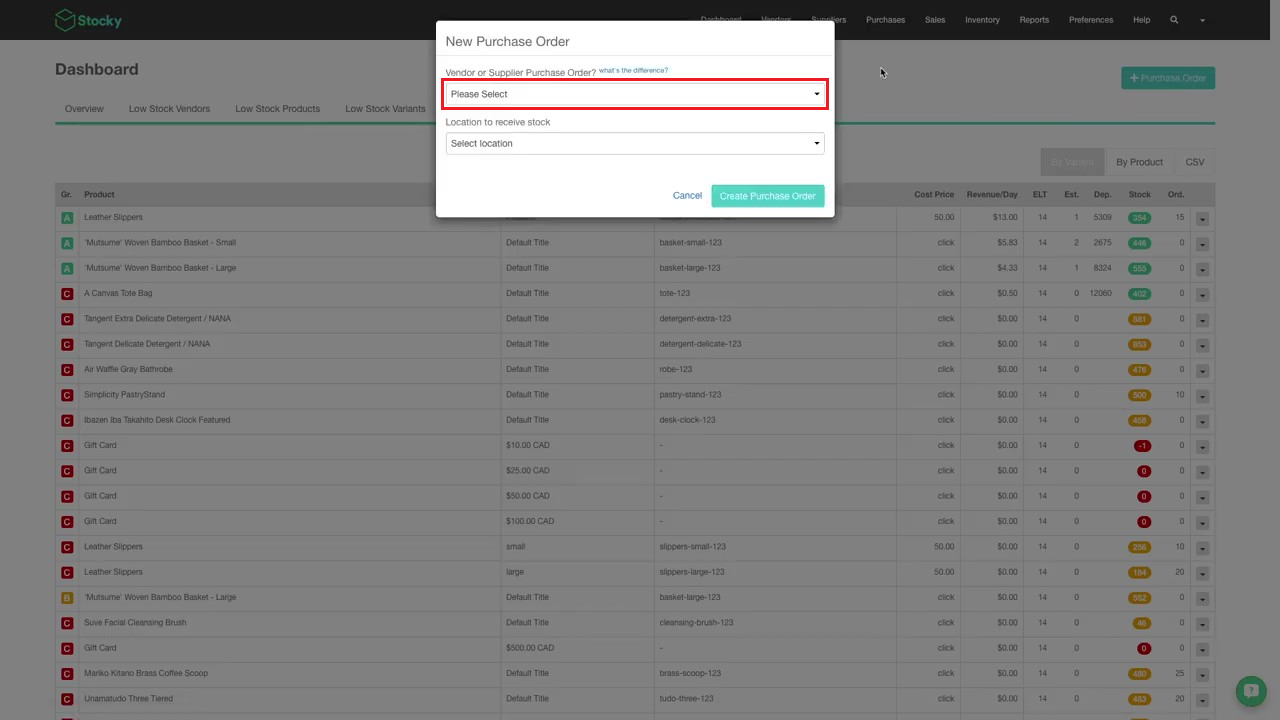
3. Select the vendor/supplier the purchase order is for.
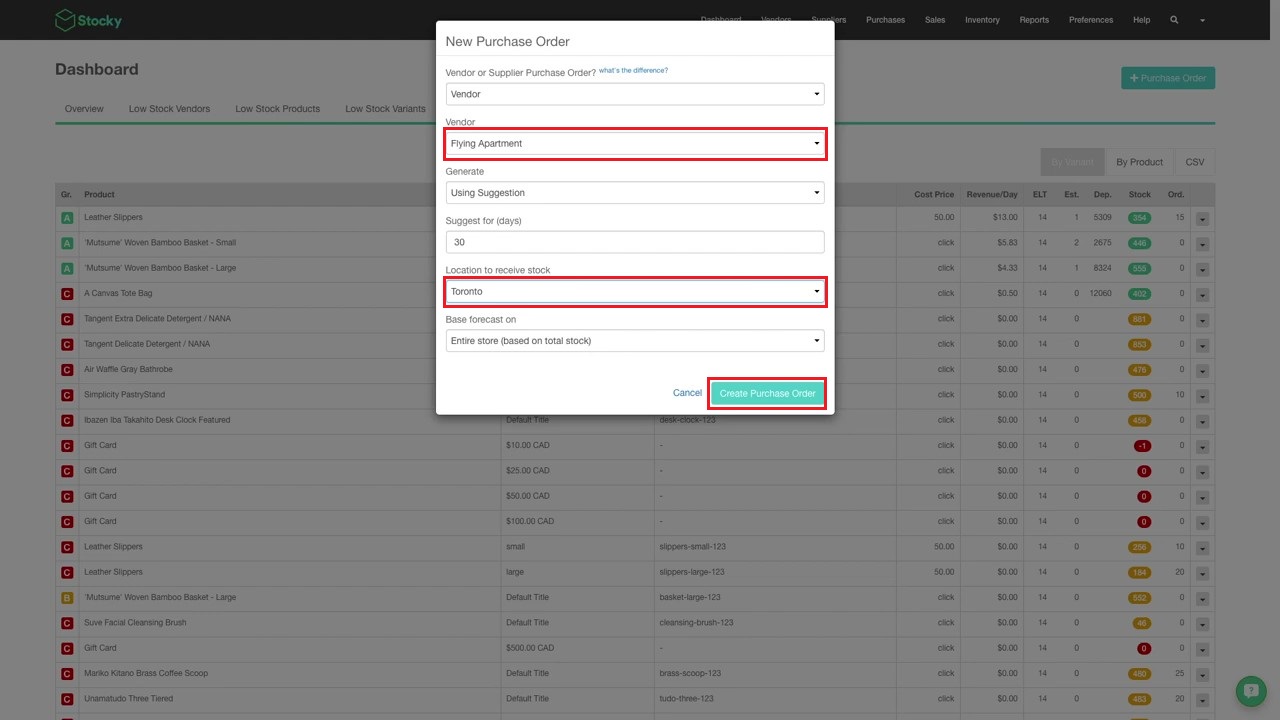
4. Pick the location you want to receive stock.
5. Click on the Create Purchase Order button.
Stocky will intelligently recommend how much stock to order based on the rate of sales, what's in inventory, and what's coming in.
You're able to make any adjustments to this forecast. To do so, change the value of the 'Forecast type', 'Forecast location', 'Suggest for (days)', 'Sample period (days)' boxes. Then, hit the Regenerate button. Here are all the types of forecasting.

You can also add any additional products to the purchase order manually.
- Select a product using the drop-down menu below the table.

2. Then, type the quantity into the textbox next to it.

3. Finally, click on the Add button to add the product and its quantity to the table.
4. Repeat the process until all the required products are added.
Or, you can bulk import with a .csv file or barcode scanner. Just click on the + Products button, and these options will be shown.

You can also change the base price of each item based on what was negotiated with the supplier. Just click on the value you want to change in the Cost (base) column to do so.

Once you're ready, you can send the purchase order to the vendor supplier. This can be done directly in Stocky with a personalized message and a .csv file attached. Just click on the Send button.

You can also download the purchase order as a .pdf file by clicking on the Download button.
Once the vendor/supplier has received the purchase order and confirmed that they can fill it, remember to click on the Confirm button. By doing so, all the items will be marked as 'not received'.

Get the Order at Your Physical Store
Once the new items arrive in your store, you can sync the products with Shopify by clicking on the Get & Sync Selected button. If an item is missing, you need to uncheck it before hitting the button.

Suppose the vendor/supplier sent a different number of items than you expected, or some of them were damaged in transit. In that case, you can receive a portion of them and place the rest on back-order.
- Click the arrow button next to the item's Quantity column. In the drop-down menu, click on the Partially receive option.

2. Type in the number of products you have received. You can also add notes if needed.

3. Click on the Update button. The items are now split into two rows.

4. Repeat the same process if necessary.
5. Finally, click on the Get & Sync Selected button.
Items missing or damaged during shipment get automatically placed on backorder with the vendor/supplier.
You can also pick up items using a standard USB barcode scanner.
- Click on the arrow button next to the Download button. Then, select the Barcode scanner receive option.

2. Scan each item using your barcode scanner to increase the scanned count. You can also update it manually by clicking on the plus and minus icon next to the Scanned column.

Stocky helps ensure orders are scanned accurately by flashing in yellow if under scanned, green if scanned accurately, or red if over scanned.
3. After you've scanned all of your items, click on the 'Receive Scanned' button.
4. Here, you can re-check to confirm inventory has been received or placed on backorder before syncing with your Shopify store.

5. Finally, click on the Receive & Sync button to update your Shopify inventory.
Final Words
Shopify has done an extraordinary job providing comprehensive tools for all Shopify store owners.
It provides a free tool to help you create unlimited Shopify purchase orders for your stores. For larger stores, you may already have subscribed to Shopify POS Pro anyway. And Stocky is a full-fledged inventory management app that can cover everything you need.
Disclosure: When you purchase a service or a product through our links, we sometimes earn a commission, without any extra cost to you.

![]()