How To Find and Submit Your Shopify Sitemap To Google?

To guarantee that search engines effectively index and rank your Shopify site, you need to locate and upload a sitemap. Your sitemap should be structured in a way that makes it easy for search engines to crawl and index your material. Furthermore, it should also assist you to identify any issues with your site's design that may be preventing your pages from being indexed and ranked.
Here, you'll learn how to easily generate a Shopify sitemap in step-by-step instructions. Let's begin by learning what a Shopify sitemap is and why it is imperative for you to have it.
What is a Shopify sitemap?
A Shopify sitemap is a text file that lists all the information on your Shopify store’s website. A sitemap often includes these contents:
- The primary location of the website.
- The last modification time of the file is recorded
- How often the page is updated
- Priority (importance) information about each page
Because of the instant notification of any changes that this additional data provides, it is of great value to search engines. However, it should be noted that even if your sitemap is great, it should not be the only task in your SEO checklist that you should do to ensure a higher ranking.
However, by including one, you improve your pages' chances of being indexed by search engines and hence of being displayed in the search engine results pages (SERPs).
Why is Shopify sitemap important?
Search engine optimization relies heavily on your XML sitemap. It remembers your most vital sites and submits them to Google for indexing. In other words, your site's structure is communicated to Google via the appearance of sitemaps only.
By providing Google with a sitemap of your Shopify store, you can improve your search engine rankings. It's a piece of code that you embed onto every page of your store to help Google's automobile bots (also known as "spiders") understand what each page is for and how it functions. Simply put, if a Shopify store has a clean, error-free sitemap, it will rise faster and higher in the Google search results.
Although Shopify does create an XML file (the sitemap) automatically for your store, you can speed up Google's indexing of your store by manually submitting a sitemap. The more pages your site has, the longer it will take for search engines to crawl it, analyze its content, and factor it into its rankings.
Thus, having a sitemap will speed up the process considerably. Even if your website contains orphaned and useless pages, a sitemap can also help search engine spiders identify these and avoid them to be searchable as well.
How To Find A Shopify Sitemap?
If you want to find your Shopify Sitemap, simply append “/sitemapXML” to the end of your online shop's URL, and you'll be sent directly to the sitemap that Shopify has prepared for you. As a consequence, you should see the following:
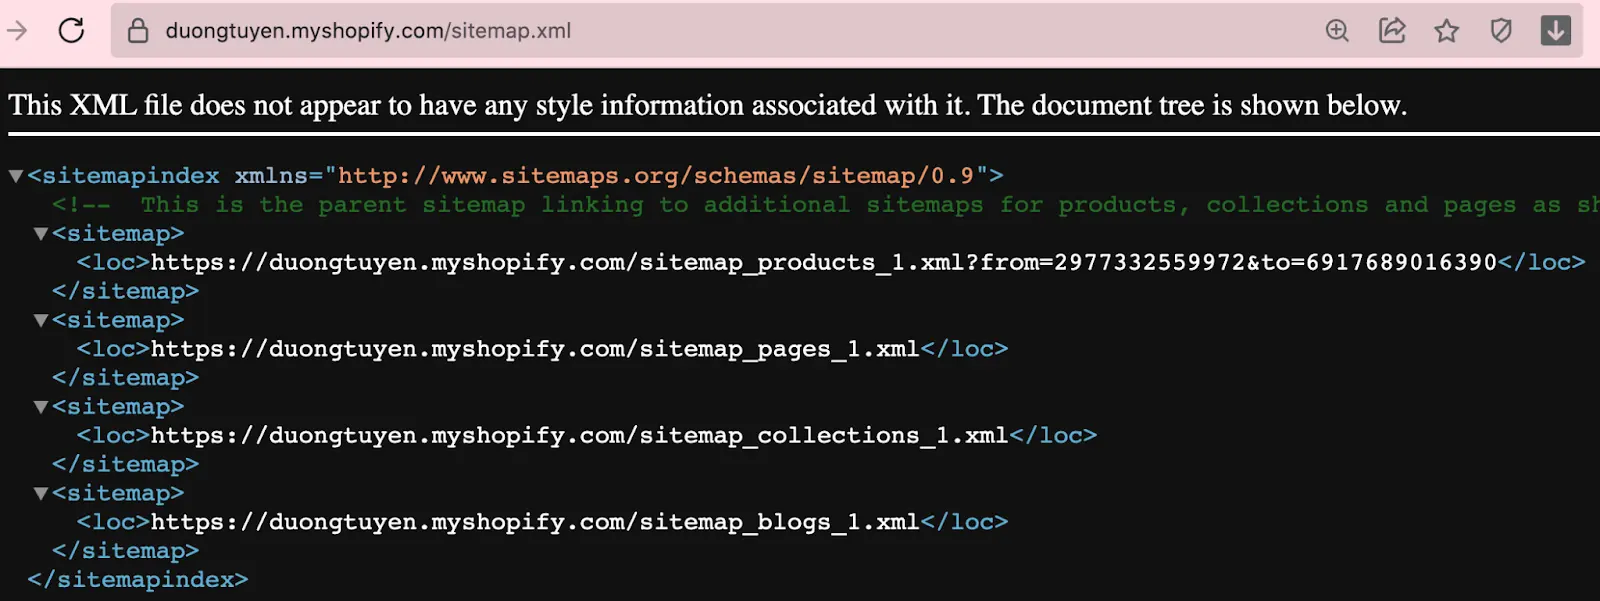
All of your goods, collections, blogs, and websites will have their own sitemaps that are linked to the sitemap files that are generated. When you update a Shopify page, product, collection, image, or blog post, the corresponding sitemap file is updated in real-time.
A sitemap for your primary domain is all you get with the Basic Shopify account. Sitemaps for any extra domains used for overseas markets are included with the Shopify plan and above. Make sure all of your secondary domains point to your major domain if you don't intend to use them for foreign targeting.
However, this method cannot be used to read sitemap files in secured stores. If you type in “/sitemapXML” into the website but face the following notice, it is because your page is secured by a password:
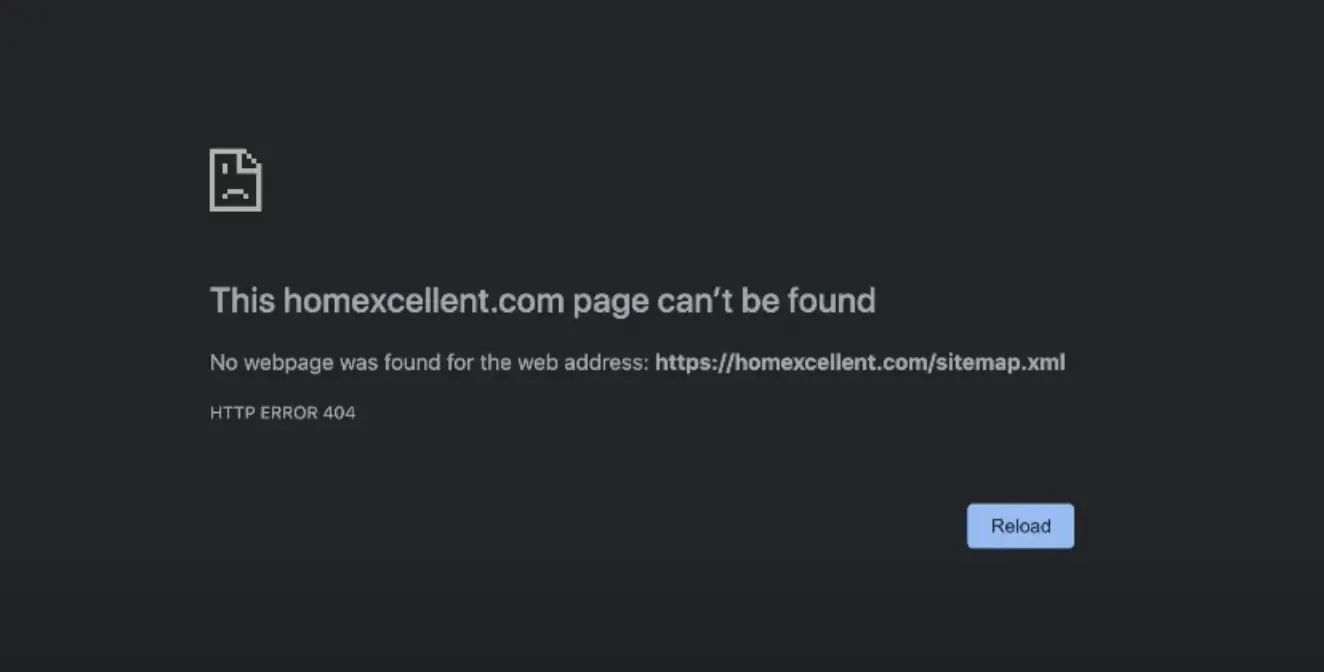
As a result, before submitting the Shopify sitemap, make sure that any shop passwords are disabled. Thus, here is what you need to do:
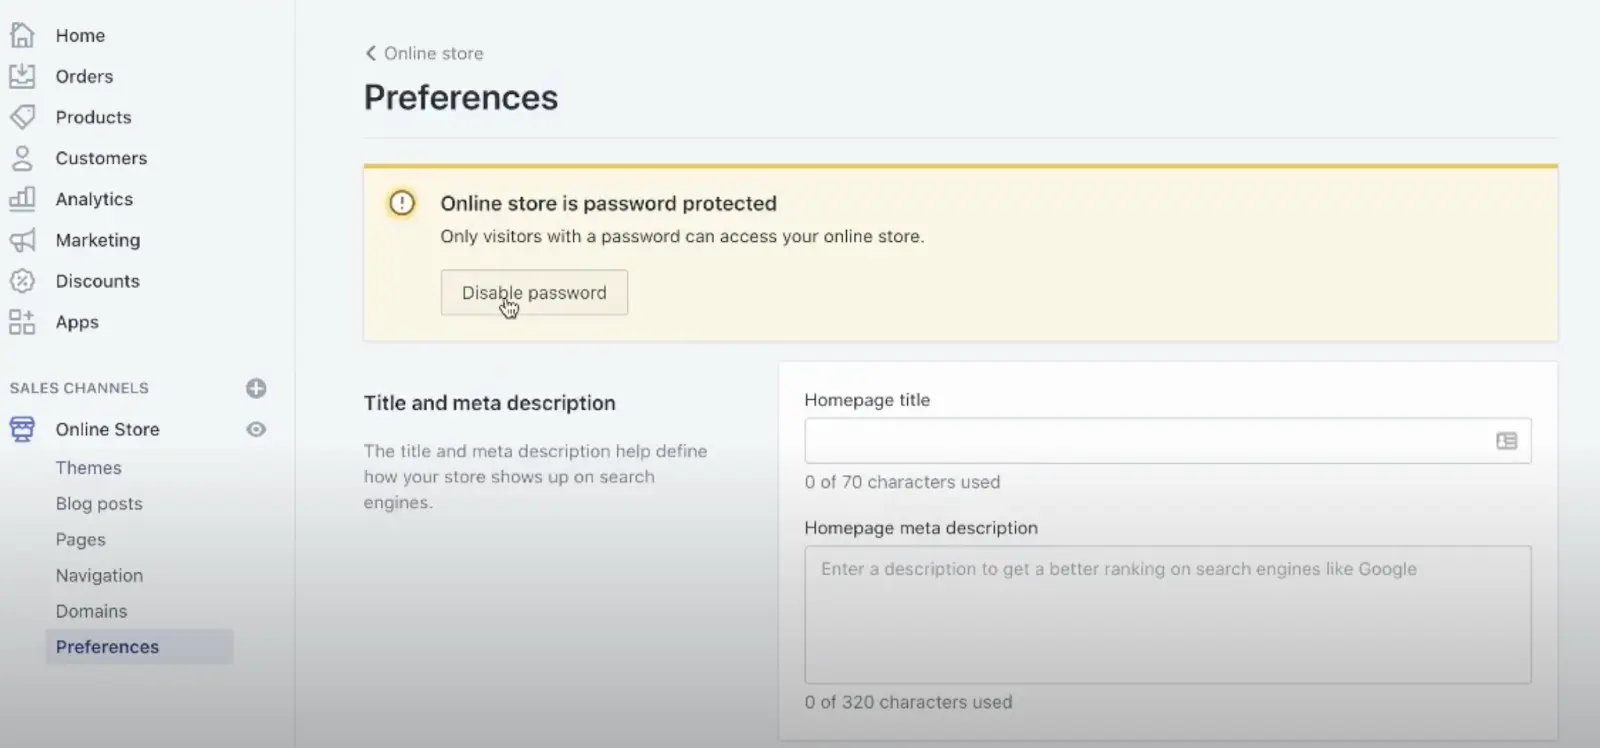
Step 1: Go to Themes > Preferences, you should see that there is a Disable Password button, click on it.
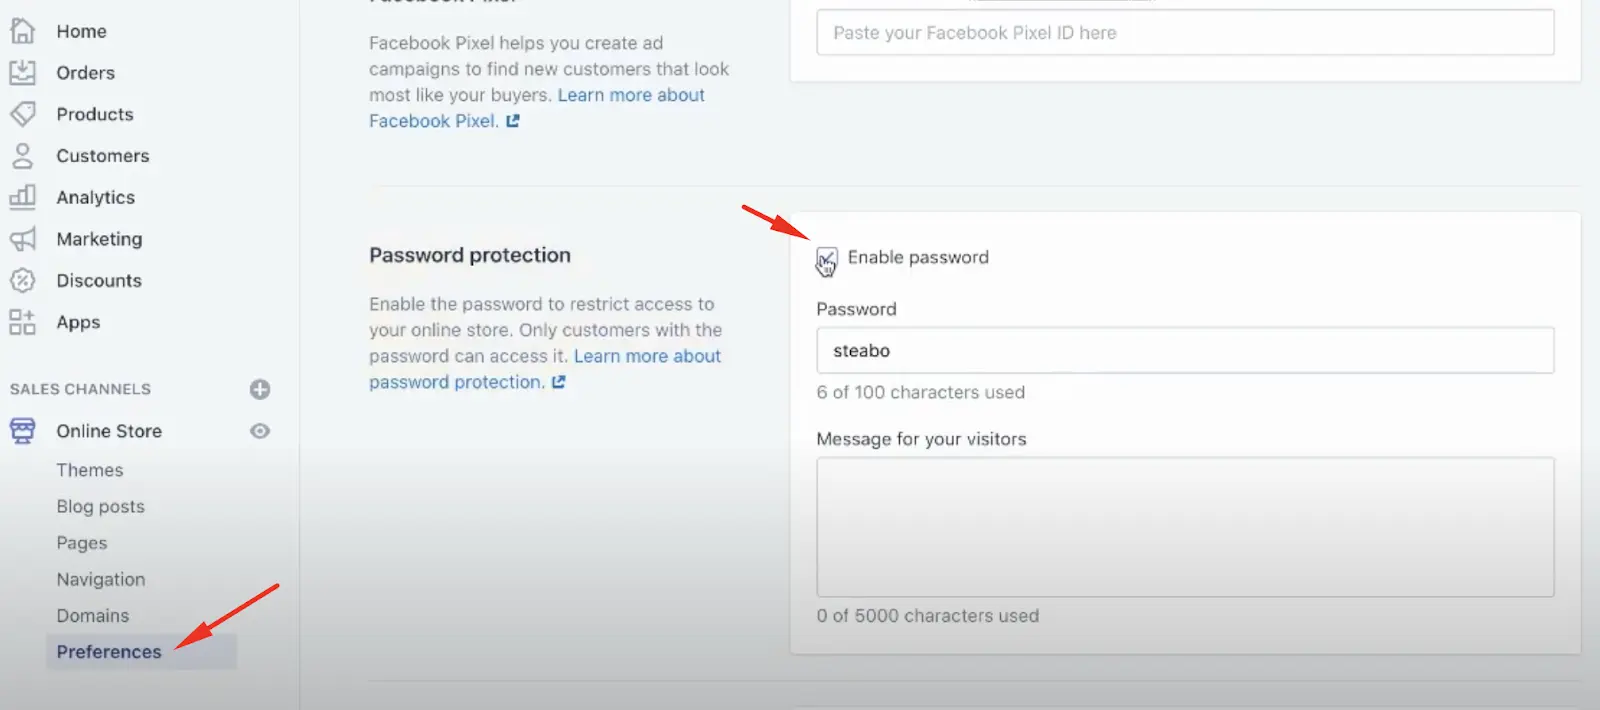
Then, scrolling down to the Password Protection section and click on Enable password or Restrict access to visitors with the password if it is checked.
Now, when you revisit your sitemap, you should be able to view the XML file.
How To Verify And Submit It To Google?
You can add your Shopify store to Google Search Console once you find your Shopify sitemap. Here is where you'll add domains for Google to index in order to increase your store's exposure.
Step 1: Verify the domain
When you first access Google Search Console, you'll see two tabs appear:
- Domain: If you register your complete store's domain, Google will be able to collect information about your customers from every page of your website. You can use any protocol (http, HTTPS, etc.) and any subdomain (m., www., etc.).
- URL Suffix: When you register a URL suffix with Google, the search engine will focus its monitoring efforts on that prefix only. You can monitor your blog's statistics without worrying about their affecting those of the main domain or any of the site's other protocols.
If you want Google to index all of your pages, you should probably use a domain. But if you only want Google to follow a subset of your site's pages, you may use a URL prefix to do so. In this article, I'll demonstrate how to validate your complete Shopify store using the domain option, since this is the most popular one.
We will fill in the domain field from the Shopify sitemap with the whole address of my online shop, excluding any subdomains or protocols. After entering it and clicking "continue," the following window appears:
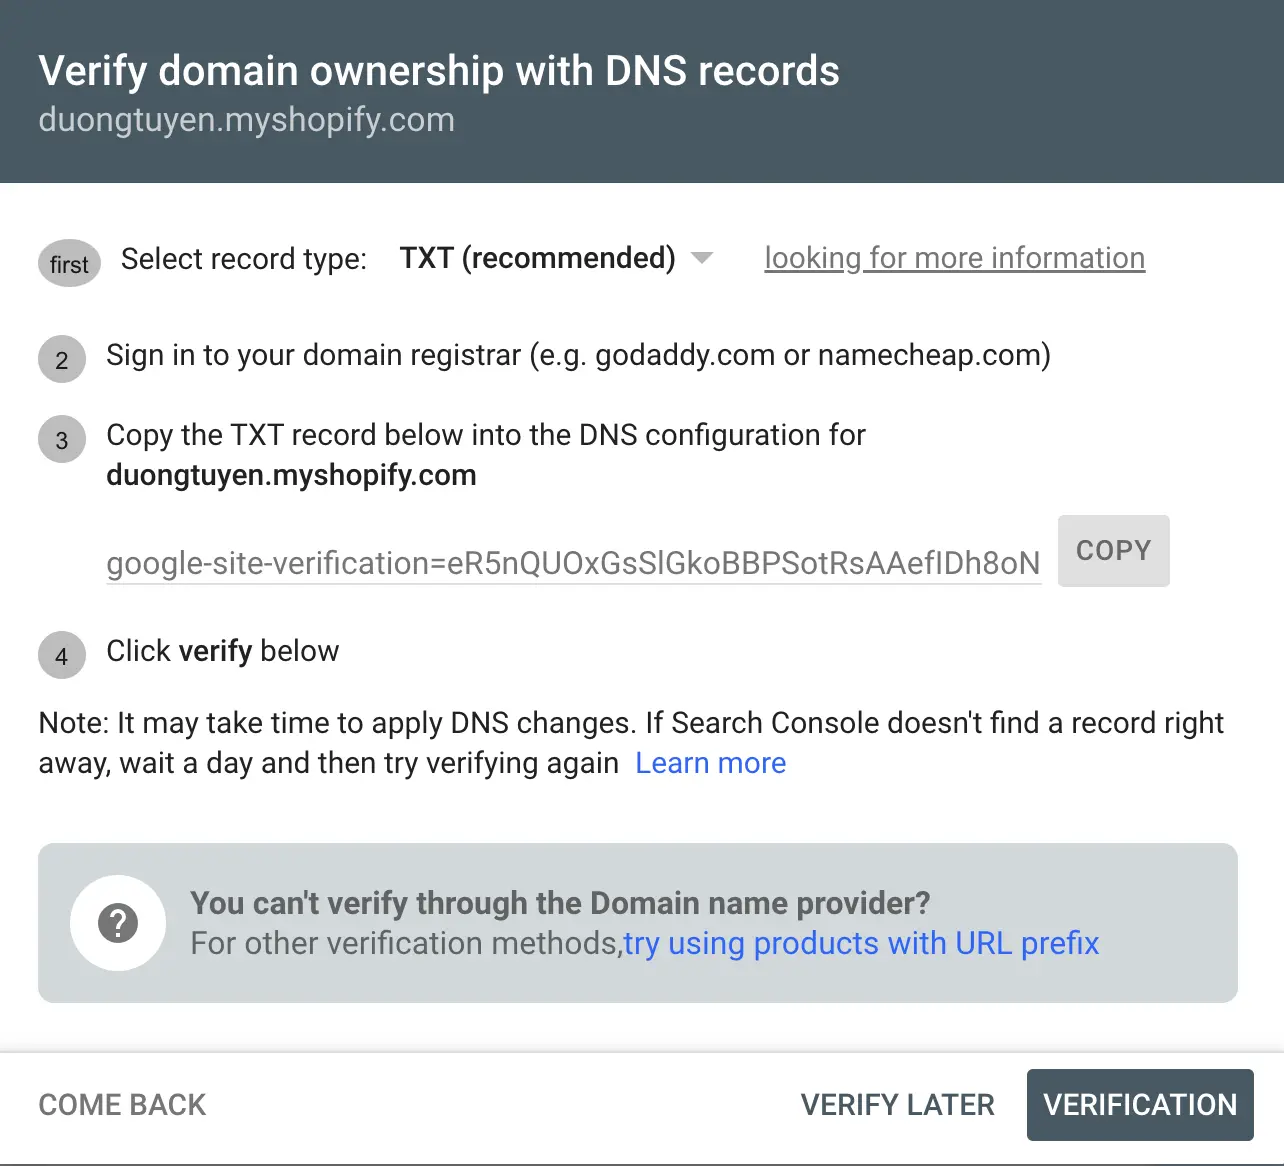
The instruction is clear, to validate the domain and Shopify sitemap, we must follow these steps. Firstly, you should choose the TXT file. Then, you need to go to the site of domain name provider. In here, we will be demonstrating how to set up your domain name servers with the help of the domain registrar godaddy.com. However, you can be certain that the principles can be adapted well to any other domain registrar.
Accessing "my products" in the "account settings" section of godaddy.com. Under 'All products and services,' multiple domains should list here. You should look for the domain we are verifying, then adjusting its domain name servers by clicking on the corresponding DNS button. It should bring you to the Records section.
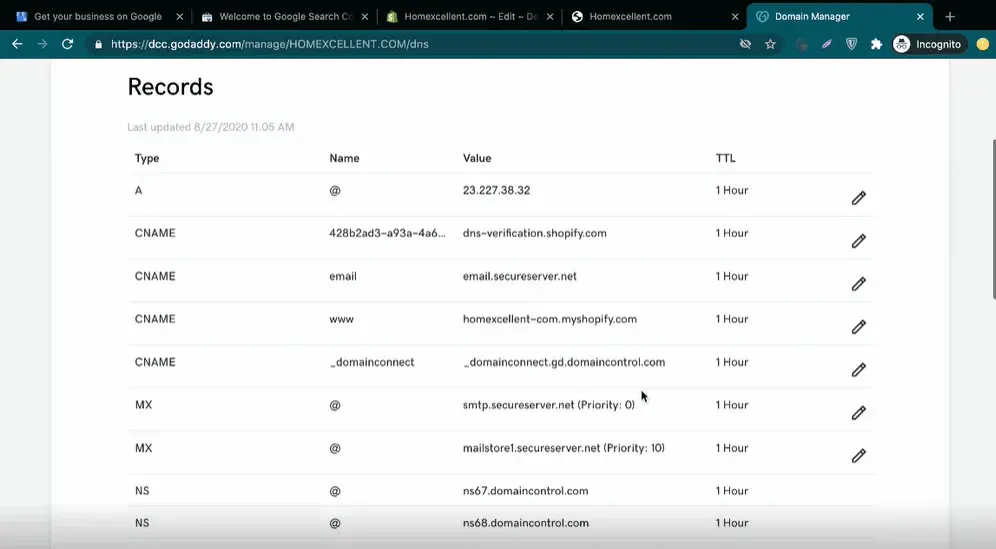
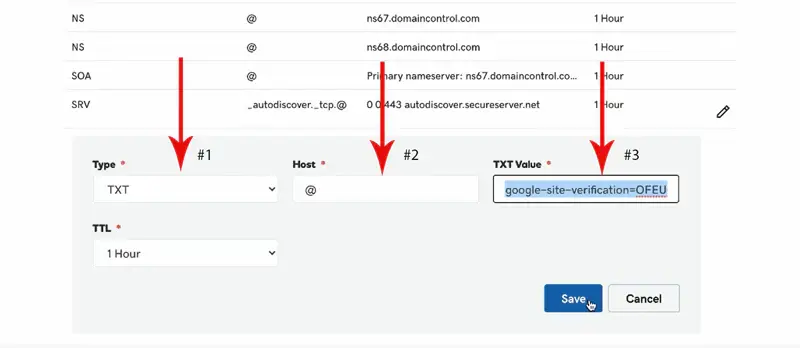
You need to look for the TXT file under the “Type” column, then, press the delete button. After that, you need to create a new entry by clicking the "Add" button and entering the necessary information:
- Choose TXT under "Type"
- The 'Host' box requires a @ symbol.
- In the 'TXT Value' field, go back to the Google Search Console and paste the TXT record copied from the Google Search Console pop-up.
If you do it right, then it is noted that you have managed to go through the 3 steps mentioned above. The last step is only going back to the previous page and click “Verification” to finish Shopify sitemap’s validation.
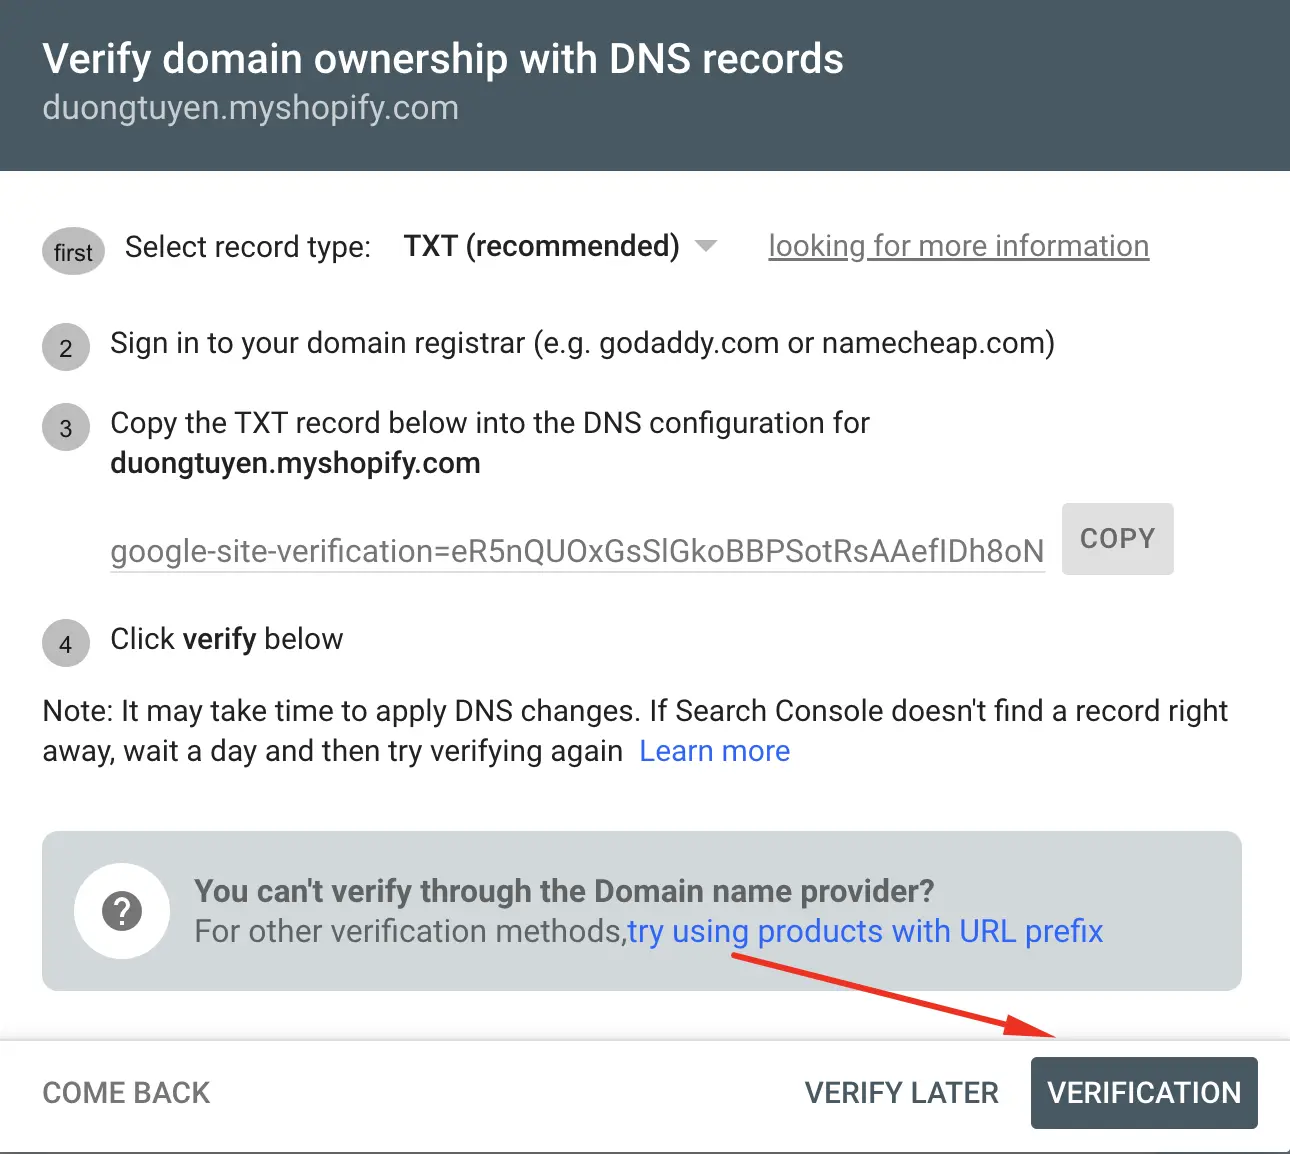
And, you are done! You have successfully verified the domain to Google. The only last process you need to do is to submit it, and it should only take a few minutes to be done.
Step 2: Submit to Google
To create a sitemap, go to Google Search Console and select Sitemaps from the sidebar. Copy and paste your sitemap's URL into the Add a new sitemap field, then click the Submit button. If you've followed our instructions to this point, you should see a confirmation message and have your Shopify sitemap submitted.
And, that’s finished! Now that Google has your Shopify sitemap, your store will be indexed and shown more quickly.
Conclusion
In this article, we have presented the need of Shopify sitemap as well as a step-by-step guide to help you create one by yourself without the help of professionals. If you enjoy reading these how-to tutorials like this, make sure to subscribe to our mailing list to stay ahead with your Shopify business.

![]()