How to Create a Checkout Page in WordPress: Only 5 Steps
If you're using WordPress as your platform, you're in luck!
In this article, we'll guide you through the steps on how to create a checkout page in WordPress that not only looks professional, but also maximizes conversions. A well-designed checkout page is crucial for turning visitors into paying customers, reducing cart abandonment, and ultimately boosting your online sales.
So, let's discover the essential tips and plugins to create a smooth and user-friendly checkout experience on your WordPress website.
Why Do You Need a WordPress Checkout Page?
A checkout page serves as the final step in the customer's journey towards making a purchase. It plays a pivotal role in converting website visitors into loyal customers.
Here are five reasons why having a checkout page in WordPress is necessary:
Secure transactions
A dedicated checkout page ensures secure and encrypted payment processing, giving customers the confidence to share their sensitive information, such as credit card details.
Professionalism
A well-designed checkout page lends a professional look to your online store, instilling trust in customers and increasing the likelihood of completing their purchases.
User experience
A streamlined and user-friendly checkout process reduces friction for customers, leading to higher conversion rates and fewer instances of cart abandonment.
Order management
A dedicated checkout page helps organize and manage orders effectively, making it easier for both the customers and the store owner to track purchases.
Integration with payment gateways
WordPress checkout pages can be integrated with various payment gateways, providing customers with multiple payment options and increasing the accessibility of your online store.
What Should You Consider When Creating a WooCommerce Checkout Page?
When creating a WooCommerce checkout page, several crucial factors should be taken into consideration to ensure a seamless and effective buying experience for your customers:
Simplicity
Keep the checkout process simple and straightforward. Avoid unnecessary form fields and steps that might deter customers from completing their purchase.
Security
Prioritize the implementation of SSL certificates and secure payment gateways to instill trust in customers and protect their sensitive data during transactions.
Guest checkout option
Provide a guest checkout option, allowing users to make a purchase without the need for account registration, reducing friction and encouraging conversions.
Use Calls-to-action (CTA)
Use prominent and well-placed CTAs to guide customers through the checkout process and make it easy for them to proceed with their purchase.
Shipping and tax Information
Display transparent shipping and tax details upfront to avoid last-minute surprises and cart abandonment.
Regularly test the checkout process to identify and resolve any issues or bottlenecks that may arise. Incorporating white label WordPress development into your strategy can significantly enhance the robustness and adaptability of your online platform. By considering these factors, you can optimize your WooCommerce checkout page, enhancing user experience, boosting conversions, and ultimately driving the success of your online store.
How to Create a Checkout Page in WordPress: Detail 5 Steps
For this guide, we will use SeedProd to develop a WordPress checkout page. SeedProd is the best drag-and-drop WordPress page builder, with over 1 million sites using it.
Step 1: Install and activate SeedProd
- From your WordPress dashboard > Click Plugins > Add New > Search SeedProd > Click Install Now
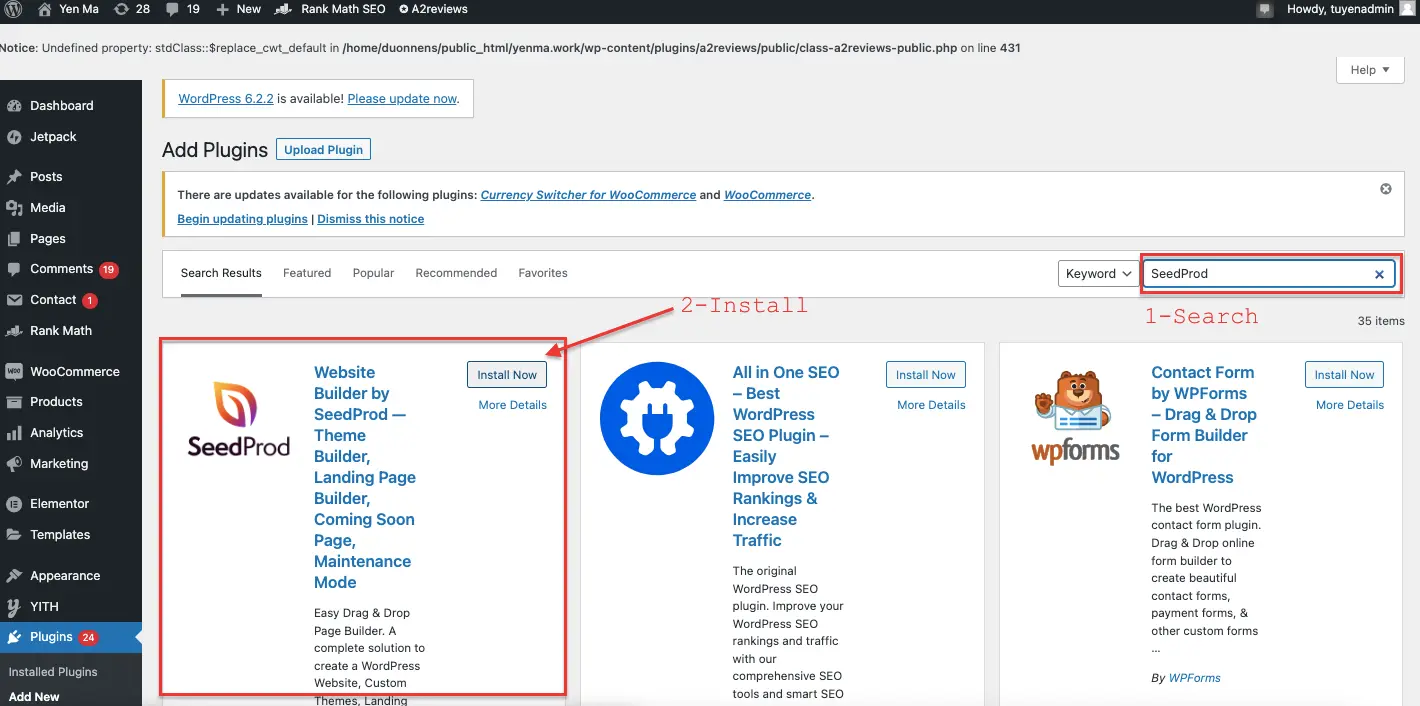
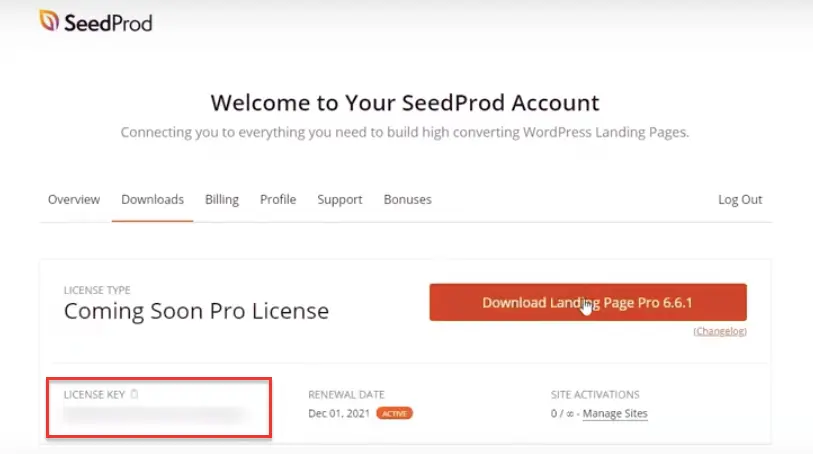
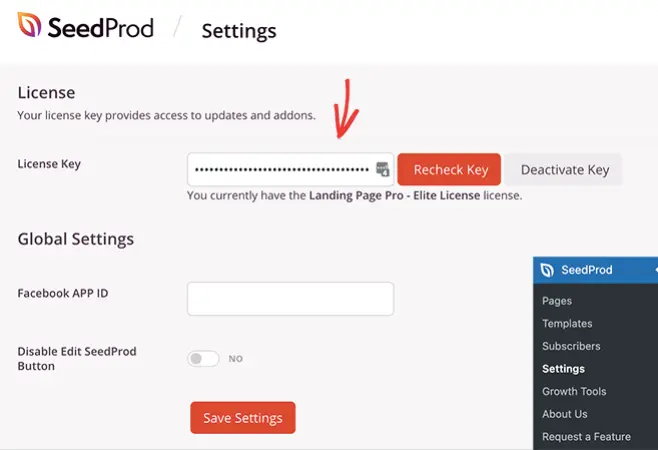
- The license key can be easily located in the Downloads section of your account on the SeedProd site.
- Once you've successfully activated SeedProd, proceed to SeedProd > Settings and input your license key.
Step 2: Create a new page
- Once your license key is activated, from your WordPress dashboard, access SeedProd > Pages. On this page, you will find a comprehensive overview of SeedProd's diverse page modes, along with an option to add new landing pages.
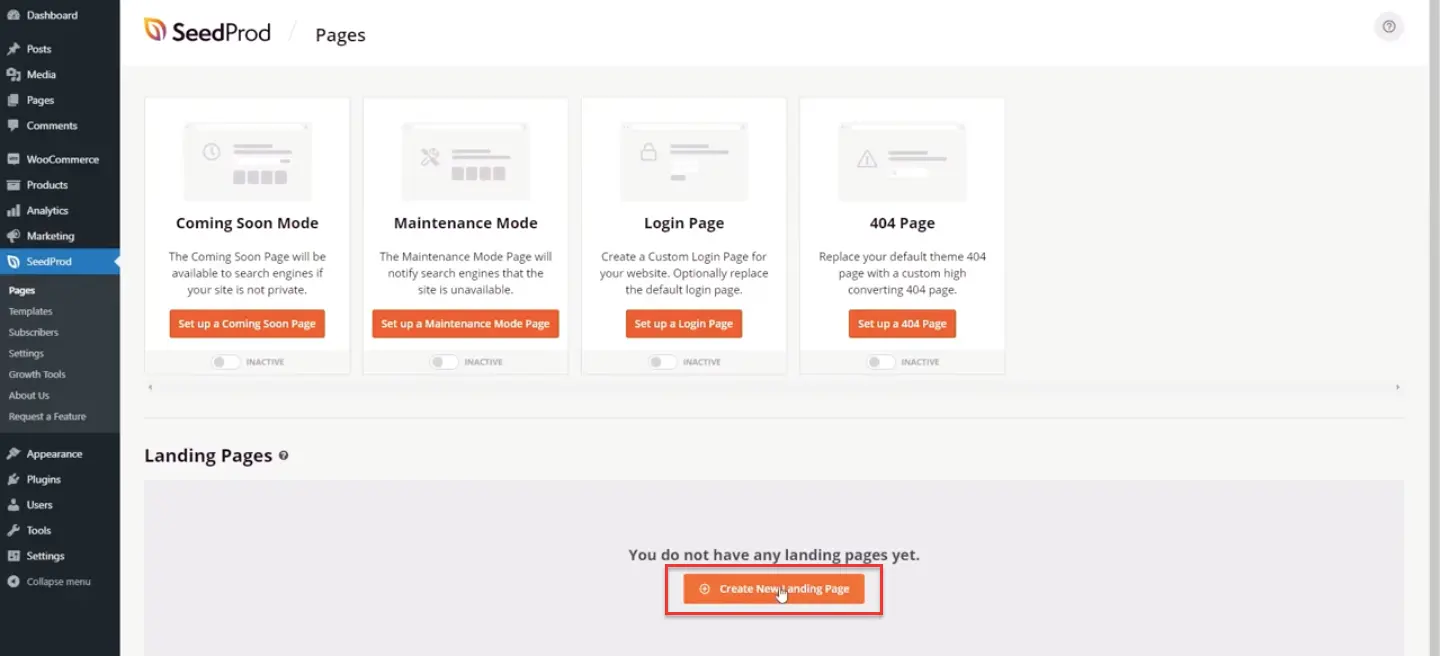
For this guide, our focus is on creating a WordPress checkout page. So, click "Create New Landing Page" button.
- On the next screen, you will be presented with an array of landing page templates. These designs can be filtered by clicking on the various tab placeholders located along the top (includes options: All, Coming Soon, Maintenance Mode, 404 Page, Sales, Webinar, Lead Squeeze, and Login).
- For the purpose of this tutorial, we will utilize the "Blank Ttemplate” to demonstrate how effortlessly you can create your WordPress checkout page without the need for a developer.
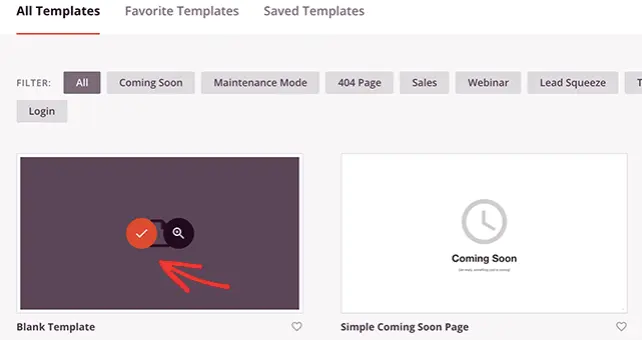
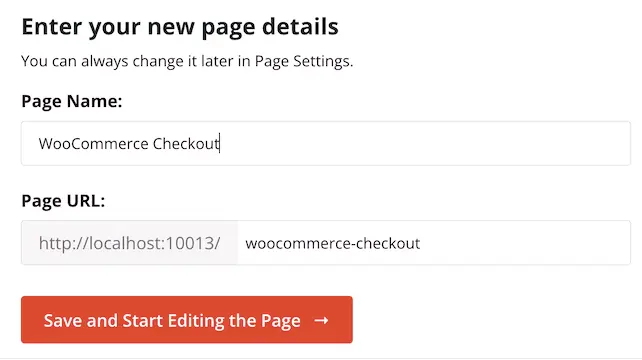
- To select the template, hover your mouse over the thumbnail and click on the orange checkmark icon. Following this, a popup will appear, requesting you to provide a name and URL for your page.
- After completing these steps, proceed by clicking the "Save and Start Editing the Page" button to begin the customization process.
Step 3: Add content to your checkout page
After importing your chosen template, it will open in SeedProd's intuitive visual page builder, resembling the example below. This powerful interface empowers you to craft your WordPress checkout page and optimize it for maximum conversions.
On the right side, you'll have the privilege of witnessing a live preview of your page, while the left side houses the options panel, where you can select various blocks and sections and personalize your design.
Checkout page header
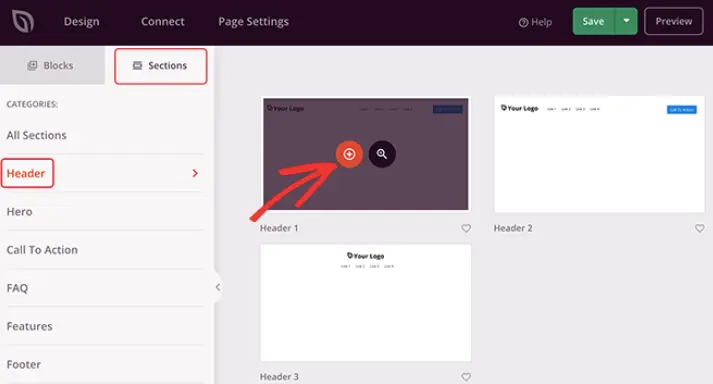
- Let's begin by adding a header to your checkout page: Click Sections tab > select Header category. Once there, hover your mouse over any header section and click the plus icon to integrate it into your page.
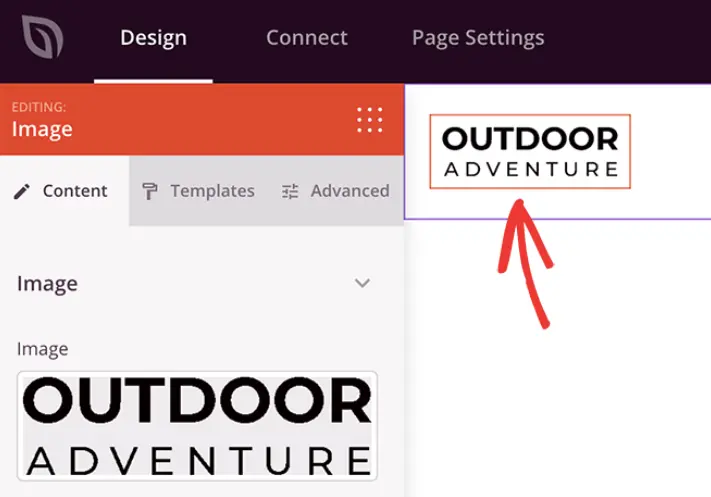
- Next, click on the image area within your newly added header section, and you can effortlessly upload an image from your computer or WordPress media library to utilize as your site's logo.
- For an improved checkout experience, we recommend removing the navigation menu from the checkout page. This will reduce distractions, encourage users to stay on the page, and facilitate smoother checkout completion.
To eliminate the navigation menu, simply hover your mouse over the navigation block, and click the trashcan icon.

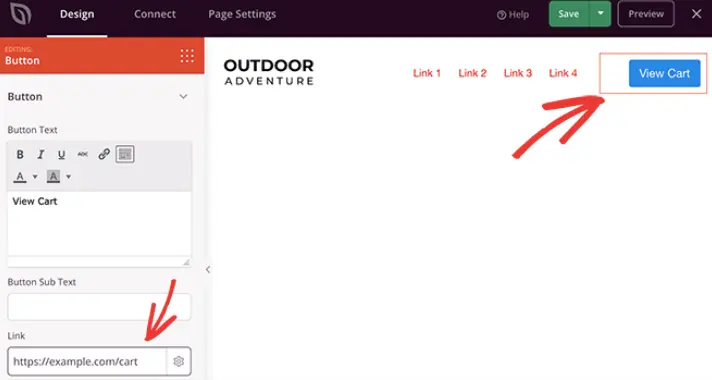
- Now, let's focus on customizing the call-to-action button (CTA). Rather than redirecting users away from the page, this button can be utilized to remind them of the contents in their shopping cart.
Click on the CTA button to access the settings and replace the default text. As an example, we changed it to View Cart.
- You can include the URL for your WooCommerce cart page in the "Link" field.
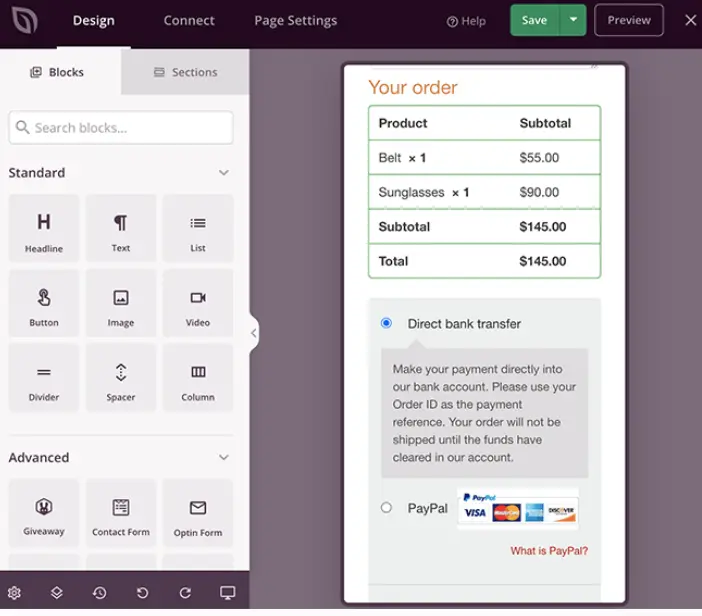
WooCommerce checkout block
Utilizing the full potential of WooCommerce, you can incorporate essential checkout functionality with form fields in your page.
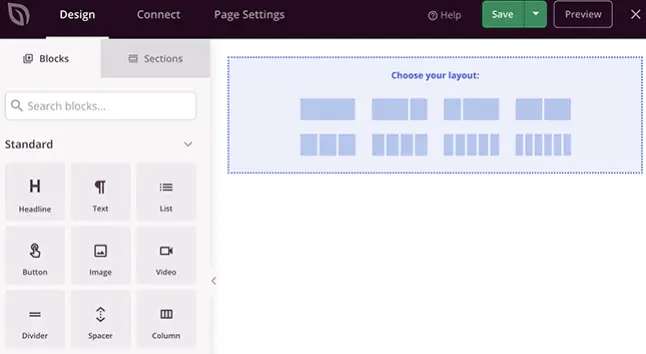
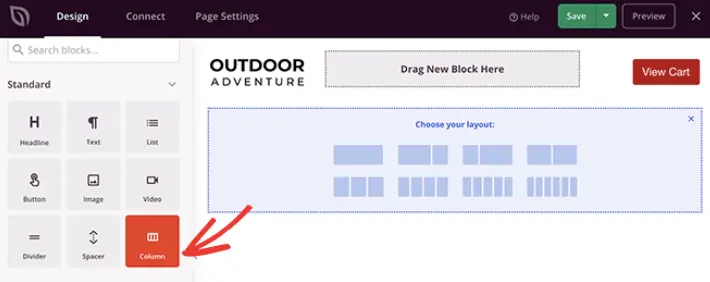
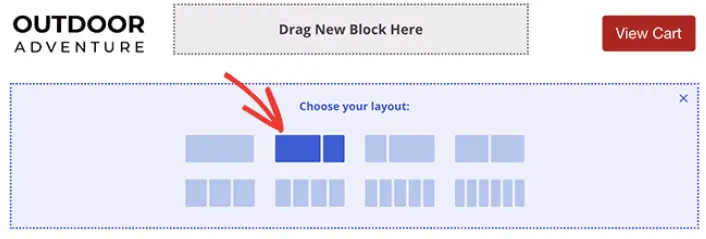
- Begin by dragging a new "Column" block in your page, followed by selecting your preferred layout.
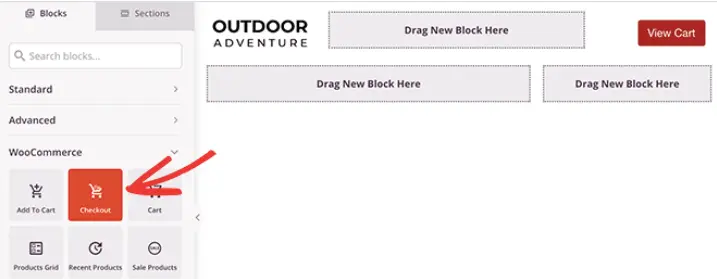
- Scrolling down to the Section> choose the "Checkout" block > add it to your page.
- Upon clicking on the Checkout block, you gain access to an array of customization options (including: 1 or 2 column checkout layout, Checkout header fonts and colors, Custom field styling, etc.)
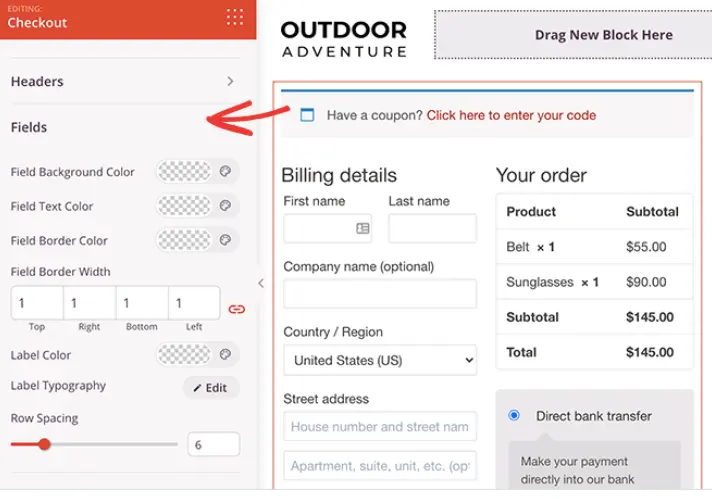
- Don't forget to click on Save to keep all your checkout field editor settings.
WooCommerce popular products
By enticing visitors to explore and add additional items to their cart before completing their purchase, you can maximize your revenue potential.
- To add popular products, go to WooCommerce section> select Best Selling Products block
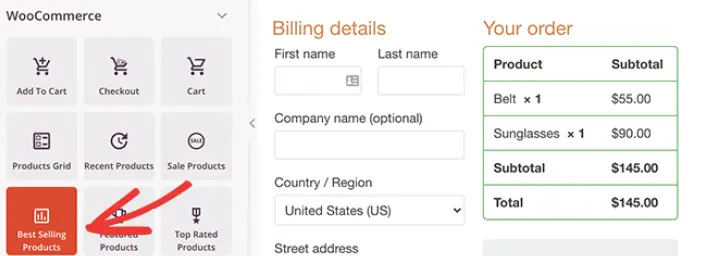
- Customize the appearance and layout of the popular products section by editing the number of columns, adding pagination, and fine-tuning other settings through the convenient drop-down menus.
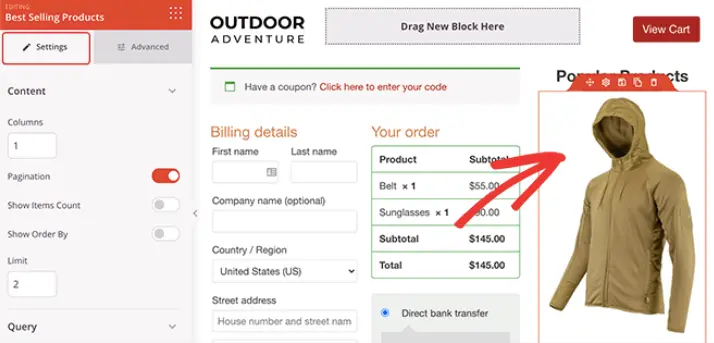
- Let’s consider modifying a headline block name to "Popular Products". This simple addition informs visitors exactly what they are looking at and increasing the likelihood of additional purchases.
Reviews and testimonials
Why not incorporate reviews, testimonials, and star ratings on your checkout page? Social proof through reviews and testimonials significantly increases the likelihood of purchase on your site.
With SeedProd, this process is effortless.
- From Advanced blocks > Click Testimonials in your checkout page.
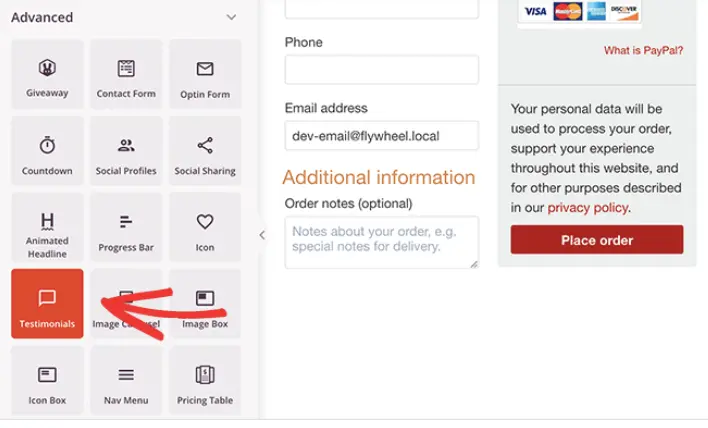
- To further reinforce social proof, consider utilizing the Star Rating block beneath the testimonials.
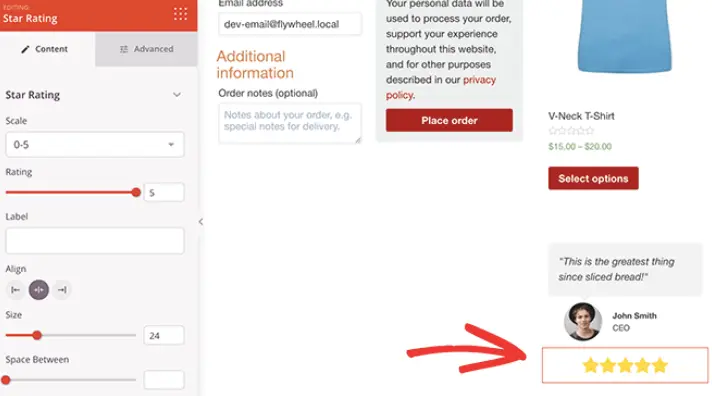
The combination of reviews, testimonials, and star ratings on your checkout page is a powerful strategy to boost conversions and build trust with your customers.
Step 4: Publish checkout page in WordPress
Once you've completed your page design, it's crucial to ensure optimal performance on mobile devices, as many people shop through their smartphones nowadays.
Thankfully, SeedProd simplifies the process by providing a preview feature for your WordPress checkout page on mobile devices.
- Easily access this feature by clicking on the mobile icon located in the bottom navigation bar.
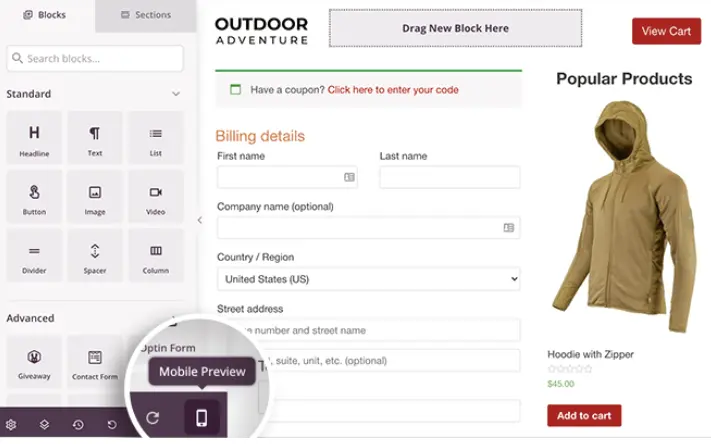
- You'll be able to view your page as any mobile user would. This convenient mobile preview allows you to identify areas that might require adjustments to enhance the user experience.
- Once you're satisfied with the appearance and functionality, simply click the dropdown arrow next to the green Save button and select "Publish" to make your customized checkout page live.
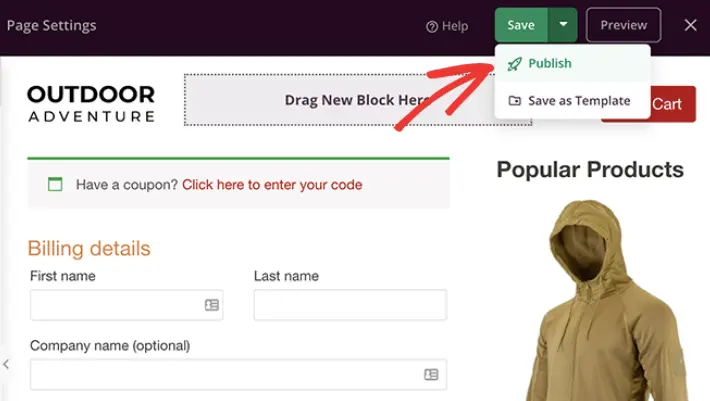
Congratulations! Instead of the default WooCommerce checkout page, you now possess a high-converting WordPress checkout page specifically tailored to resonate with your target audience.
Step 5: Assign checkout page to WooCommerce
Now that you've successfully published your custom checkout page, it's essential to update your WordPress blog or website to ensure it directs customers to the new checkout page, rather than the default one.
- Navigate to WooCommerce > Settings > Advanced tab.
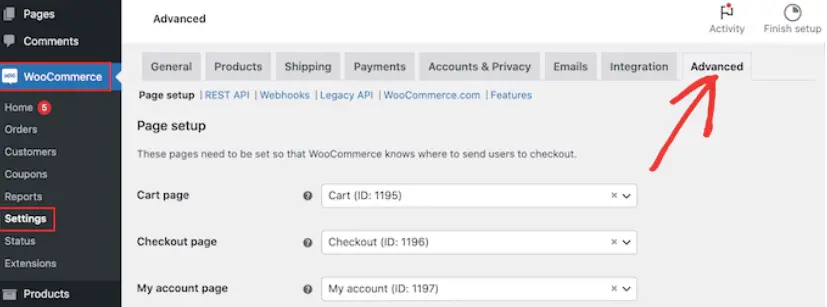
- Open the Checkout page dropdown and begin typing the URL of the custom checkout page you recently created.
- Once the correct page appears, click to select it.
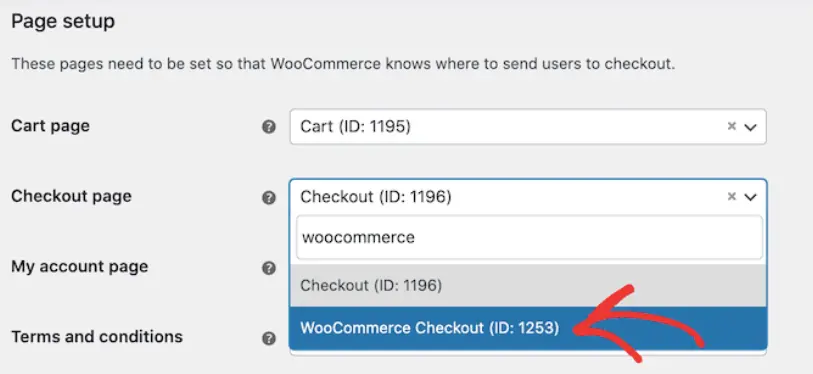
- To apply the changes, scroll to the bottom of the page and click on 'Save changes.' With this step completed, WooCommerce will now utilize the custom checkout page as the designated checkout destination, offering a great experience for your customers throughout their purchasing journey.
How to Create a Checkout Page in WordPress: FAQs
How do I add a checkout button in WordPress?
To add a checkout button in WordPress, you can use WooCommerce, a popular eCommerce plugin.
- Make sure you've installed and enabled the WooCommerce plugin.
- Go to the WordPress dashboard and navigate to WooCommerce > Settings > Advanced.
- From there, enable the option to "Enable Ajax add to cart buttons on archives."
- Save the changes.
Now, when you add products to your site,a "Add to Cart" or "Buy Now" button will automatically appear, leading customers to the checkout page.
How do I create a custom cart page in WordPress?
To create a custom cart page in WordPress, you can customize the existing WooCommerce cart page or build a new one using page builders or custom coding.
- For customization, navigate to Appearance > Customize > WooCommerce > Cart, where you can modify the cart page elements and layout.
- For advanced customization, you may need to edit the cart page template files in your theme or use a page builder to design a unique cart page.
Can you have a shopping cart on WordPress?
Yes, you can have a shopping cart on WordPress using the WooCommerce plugin. WooCommerce is a versatile and widely used eCommerce solution for WordPress websites, enabling you to set up and manage a shopping cart, product pages, and checkout process with ease.
Simply install and activate the WooCommerce plugin, add your products, configure the settings, and you'll have a fully functional shopping cart on your WordPress site.
Conclusion
Creating a checkout page in WordPress has never been easier, thanks to the user-friendly capabilities of SeedProd. By following the steps outlined in this tutorial, you can design a professional and efficient checkout process without writing a single line of code.
Remember, a well-crafted checkout page is essential for increasing conversions, reducing cart abandonment, and enhancing the overall shopping experience for your customers. With SeedProd's intuitive interface and extensive customization options, you can confidently optimize your checkout page and propel your eCommerce success to new heights on the WordPress platform.

![]()