Shopify Redirects: Everything You Should Know

Shopify redirects are simple processes that can be completed in a few simple steps. By redirecting old URLs to new URLs, you can ensure that customers are taken to the correct pages of your website and that their browsing experience is uninterrupted, and search engines are properly updated.
When you change any directions in your Shopify store, customers won't know unless you notify them. However, you cannot notify all of your customers, including loyal individuals and potential consumers. Therefore, you can use URL redirection to redirect from one page to another, so customers can still search for what they want. So in this article, I will cover everything you need to know about Shopify direction.
What exactly is a URL redirect?
A URL redirect is a technique for redirecting your visitors from one page (URL) to another. There are several sorts of redirects, the most common of which are 301 or permanent redirects.
Redirects also assist your website in maintaining the authority (and links) associated with the page you're redirecting, which benefits Google. A 301 redirect informs Google and other bots that you've relocated, and the old URL gradually slips out of Google's index.
301 redirects are the only sort of redirects that Shopify presently supports. And having them properly configured is critical not only for your consumers, but also for the SEO of your Shopify business.
Before taking a deep insight into how to create Shopify redirects, let's create a Shopify store.
Creating Shopify redirects
There are many ways to create Shopify redirects. However, Shopify makes it rather simple to set up a few redirects. If you wish to manage redirects in bulk, you may need some assistance, whether from the Shopify import/export tool or through an app. It is determined by the level of support required.
In this tutorial, we'll go over manually setting redirects, bulk uploading them, and using an app through Shopify.
Manually
Step 1. Navigate to the Online Store > Navigation.
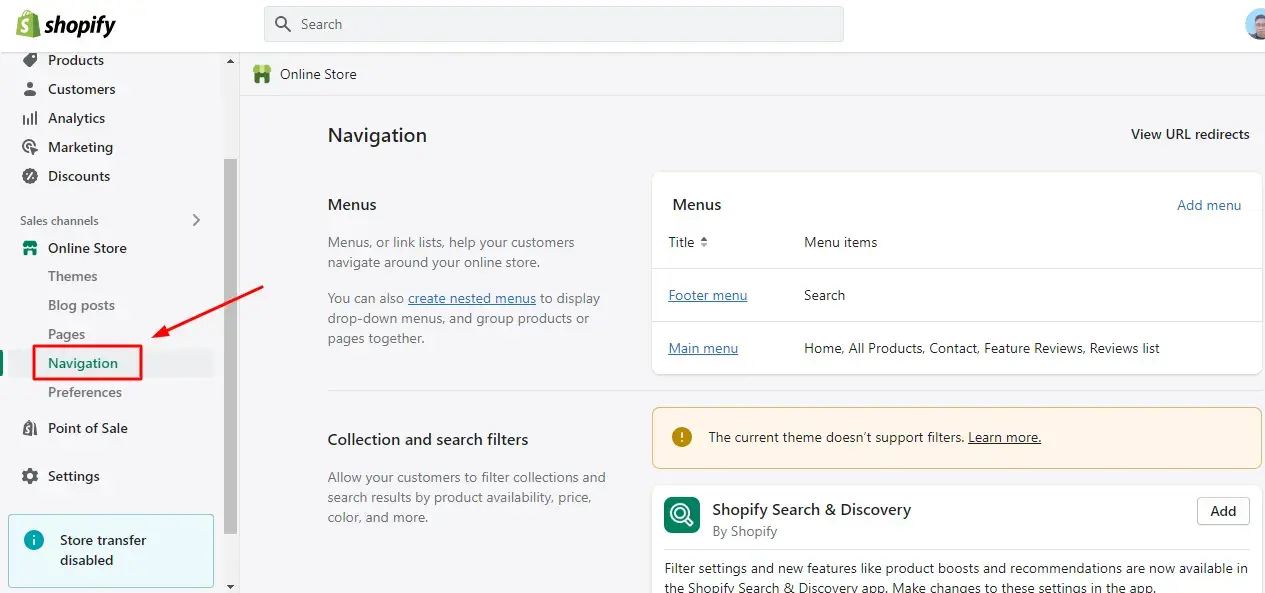
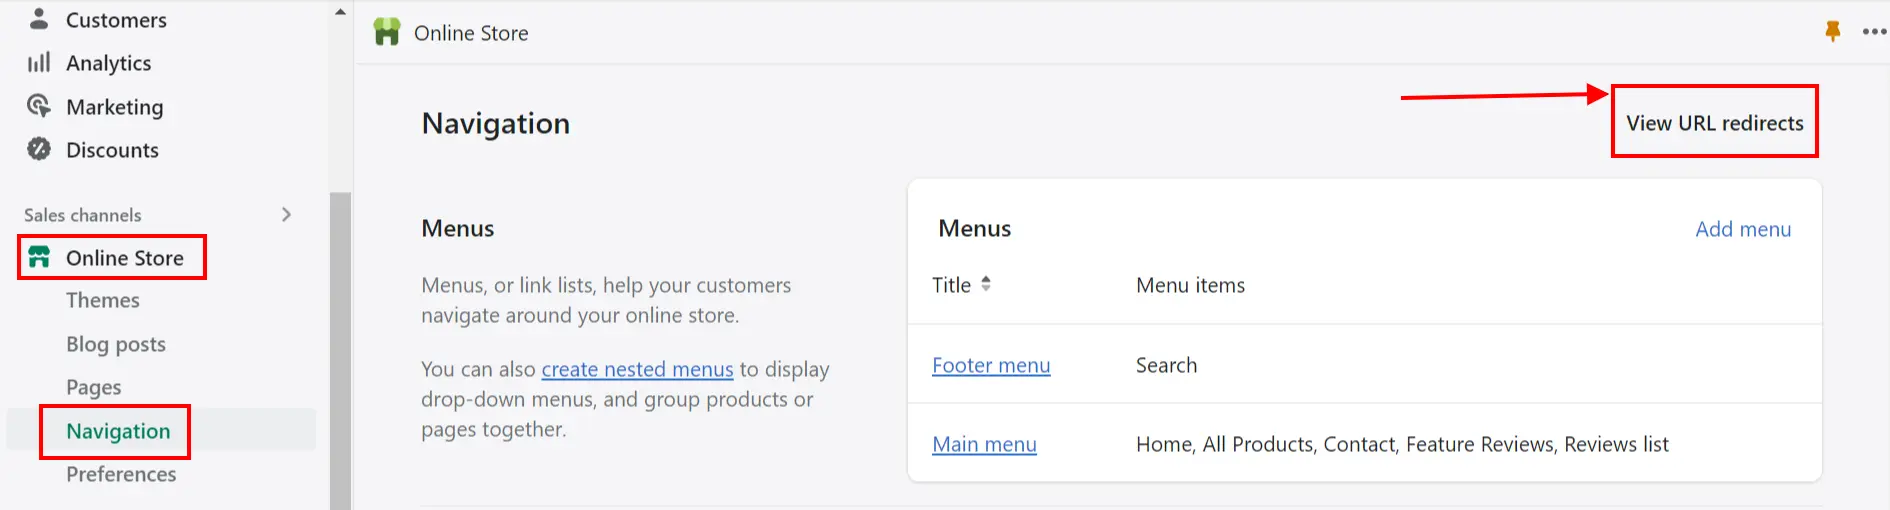
Step 2. Select View URL Redirects. This may be a (…) menu in mobile or smaller windows.

Step 3. Select Create URL Redirect from the drop-down menu.

Step 4. Follow the steps to update the screen. When the "redirect to" is on your own site, include only the page path (/products) rather than the complete URL (https://www.examplesite.com/products). If the "redirect to" address is outside your Shopify site, use the complete URL.
There are limitations to what you can redirect in Shopify. URLs that begin with the following prefixes cannot be redirected: /apps, /application, /cart, /carts, /orders, /shop, or /services.
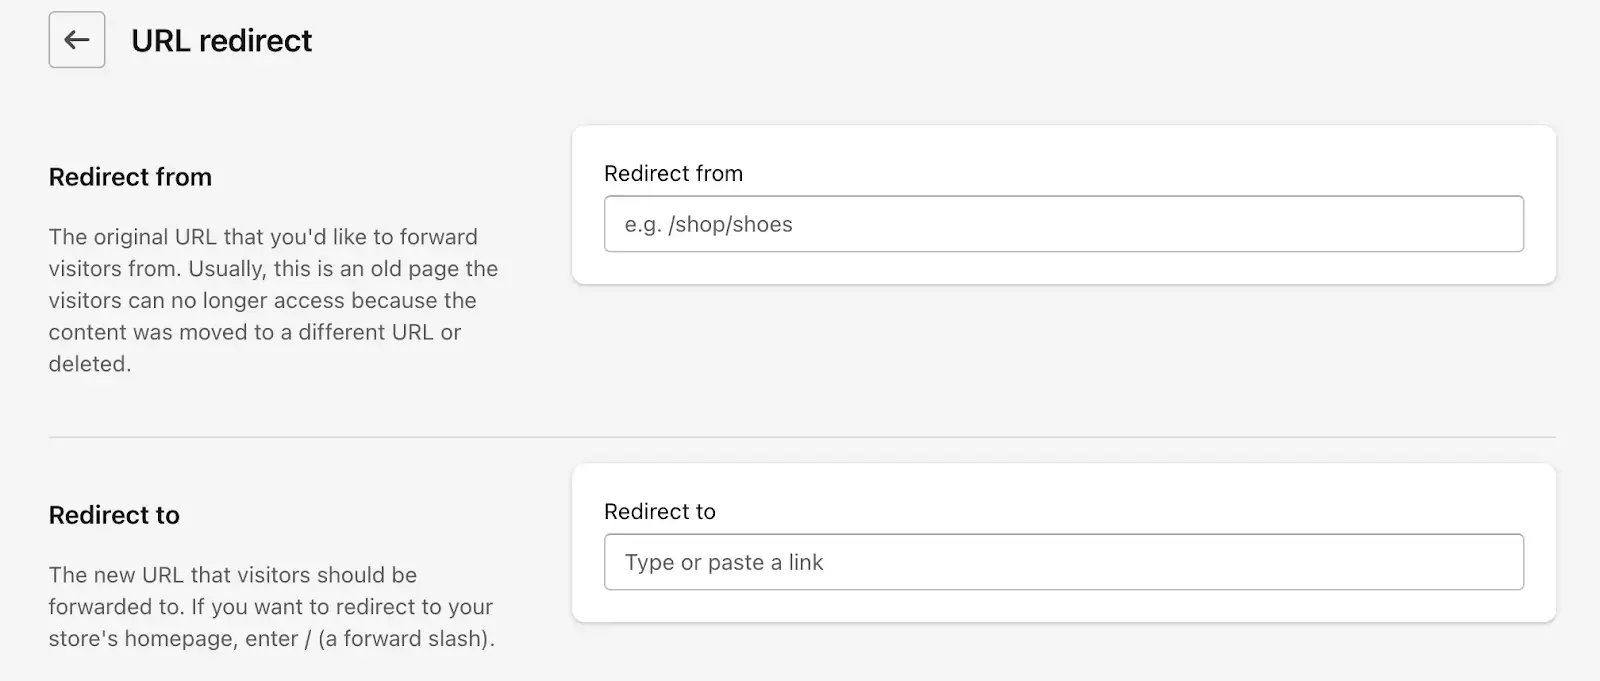
Step 5. After you've adjusted the Redirect from and Redirect to fields, click Save redirect.
Step 6. Repeat as many times as necessary to manage your redirects.
Importing redirects list
Step 1. Save the Shopify redirects example file to your computer. To list all the redirects that need to be modified, use the format in the file.
Step 2. Return to the URL redirects section (Online Store > Navigation > View URL redirects).
Step 3. Click Import on the URL Redirects menu screen.

Step 4. Select your import file from the import redirects screen.

Step 5. Select the Upload File option.
Step 6. When requested, review the URL redirection on the Import Details screen:

Step 7. Click Import redirects.
Step 8. Click Close.
Managing Shopify redirects
Once your redirects are in place, they are not invincible. Filtering, removing, exporting, and altering are just a few of the things you can do with your redirects.
Keep in mind that any modifications you make to current redirect rules may take some time for Google to detect and catalog.
Return to the URL redirects menu, where you should see a list of all the URLs that are now diverted.
If you want to edit one, select the existing link redirect and update either or both of the ” to” and “from” URL columns before saving.
At the moment, the only way to bulk alter your redirects is to export your existing redirect list, make changes, and then re-upload. There used to be a way to mass edit URLs within Shopify, however, that option has now been removed.
Using the search field, you can simply filter redirection based on what is in the URL:

Click Save filters to save a filter.

Give the filter a name and then hit the Save filters button.
After that, your stored filter will appear in the URL redirects list on the home screen as a tab next to "All."

When do you need the Shopify redirects store?
Redirects, especially for eCommerce, can be important to the success of your business and the exposure of your online store. Typical scenarios include:
- When you remove a page from your site, generally a product or category: if you've pulled a product or product line, it's sometimes a good idea to redirect it to the most relevant live product category.
- When a page is no longer up to date: this could be for a time-limited deal that will not be repeated. If you're going to run it again, use a 302 redirect or build placeholder content for the page, which would have to be done outside of Shopify.
- When you modify the URL of a page in Shopify, a 301 redirect occurs by default in most circumstances; simply check the box.
- When you alter your store's domain.
Shopify redirects should be used on your website whenever you wish to remedy something that may otherwise disrupt the customer's experience (a page with no content, an outdated offer, etc.).
What happens if the Shopify redirect fails?
There are a few things to look at to ensure that it isn't something on your end that is causing the Shopify redirect to fail. This includes the following:
- Is everything accurately spelled?
- Are the "to" and "from" fields correct — have they not been swapped?
- Is the page from which you're redirecting gone (providing a 404 error)? You may also be able to restore your page to a draft if you want to save the page's information for future reference.
You'll also want to make sure you're not cached – 301 redirects sometimes take some time to load in Shopify. Clear your cache by heading to your browser's tools (in Chrome, More tools) and selecting the option to clear browsing data.
Shopify Redirects: FAQs
How do I get rid of redirects on Shopify?
To remove redirects on Shopify, follow the step below:
- Navigate to the URL Redirects section in the Shopify admin panel
- Locate the specific redirect you wish to delete, and click on the trash icon or Delete.
- Confirm the action, and the redirect will be removed from your store.
Does Shopify automatically create redirects?
Yes, Shopify automatically generates redirects when you change the URL handle of a product, collection, page, or blog post. This ensures SEO preservation and avoids broken links. Shopify handles the redirects behind the scenes, redirecting visitors and search engines to the updated URL.
How do I set up redirects on Shopify?
To create redirects on Shopify, do the steps below:
- Access the URL Redirects section in the admin dashboard.
- Click Add URL redirect, input the old and new URL paths
- Choose the redirect type (301 for permanent, 302 for temporary)
- Click Save to set up the redirect.
How do I stop a domain redirect on Shopify?
To stop a domain redirect on Shopify, follow the process below:
- Go to Online Store > Domains in the admin panel.
- In the Primary domain section, select the original domain from the drop-down menu and uncheck the "Redirect all traffic to this domain" option if present.
- Click Save to stop the domain redirect.
Conclusion
In summary, I have discussed Shopify redirects with you. I've also included detailed drawings for almost all the steps, as well as some important remarks. With this much effort, I hope you like the writing and derive some profit from it.

![]()