How to Set up WooCommerce Amazon Payments on Your Store?
When setting up a WooCommerce store, you need to focus on payment gateways. Therefore, you can receive payments for the products you are selling.
Your customers should be able to pay seamlessly after making a transaction from your online store. If the process is too complicated, they may abandon their cart.
There are a lot of payment gateways that you can select. This article will talk about Amazon Payments—a promising payment method for eCommerce stores. You've probably used it before without noticing.
Continue to read on to know all about WooCommerce Amazon Payments: what it is, should you use it, and how to set it up.
What is WooCommerce Amazon Payments?

WooCommerce Amazon Payments is an excellent online payment solution created to give consumers more ways to purchase the things they want.
When completing a transaction on your online store, your customers will get a straightforward online checkout experience.
Amazon Payments is popular since, just like PayPal, it's quick to sign up for and integrate into online stores. You don't have to list your items on the Amazon website. You just need an Amazon account as a Seller to use it.
However, we recommend listing your products on Amazon as well as your WooCommerce store if you use Amazon Payments. It's a great way to attract more customers.
In addition, WooCommerce Amazon Pay has a trustworthy and comprehensive guarantee. Your customers can save even more time if they have already provided their shipping and payment information to Amazon.
Why Should You Use Amazon Pay for WooCommerce?
According to Amazon's report, 91% of users decided to continue using Amazon Payments over the years. So what are the reasons behind this? Here's why:
- User-friendly interface: Consumers can quickly finish their checkout anytime, anywhere, in just a few clicks.
- Credibility: Amazon is a trusted global brand. There is a great degree of trust involved in Amazon Payments. That trust extends to companies that accept it as a payment option. Therefore, you should implement it if you want to build trust with your customers.
- Secure: Customers don't want to give out their credit card information on multiple websites. And most people already provided that information for Amazon anyway.
- Fast transaction processing: Consumers will no longer have to provide their credit card and shipping information whenever they want to make a transaction.
- Multi-currency Support: Consumers can avoid currency translation costs from their banks.
How to Add Amazon Pay to WooCommerce Stores?
Now that you know how favorably consumers have for Amazon Payments. This section will walk you through the WooCommerce Amazon Pay integration process:
Meet the Requirements
Before you get started, there are a few things you need to know about the requirements of WooCommerce Amazon Payments.
Unfortunately, up until this point, this service is only available for those in specific countries. Therefore, if your address is not on the list, you have to choose another payment gateway.
- The United States
- The United Kingdom
- Austria
- Belgium
- Cyprus
- Denmark
- France
- Germany
- Hungary
- Ireland
- Italy
- Japan
- Luxembourg
- The Netherlands
- Portugal
- Spain
- Sweden
- Switzerland
Additionally, your WooCommerce store must have an SSL certificate to sign up for an Amazon Payments Merchant account.
Install and Activate the WooCommerce Amazon Pay Plugin
If your online store meets the requirements, it's time to download the WooCommerce Amazon Pay plugin.
This will only take a few minutes. All you have to do is navigate to Plugins > Add New. Then find the plugin using the search box. The plugin should appear in the first position.

Finally, click the buttons 'Install Now' and then 'Activate' to start using the Amazon Pay plugin for WooCommerce!
Create an Amazon Payments Account
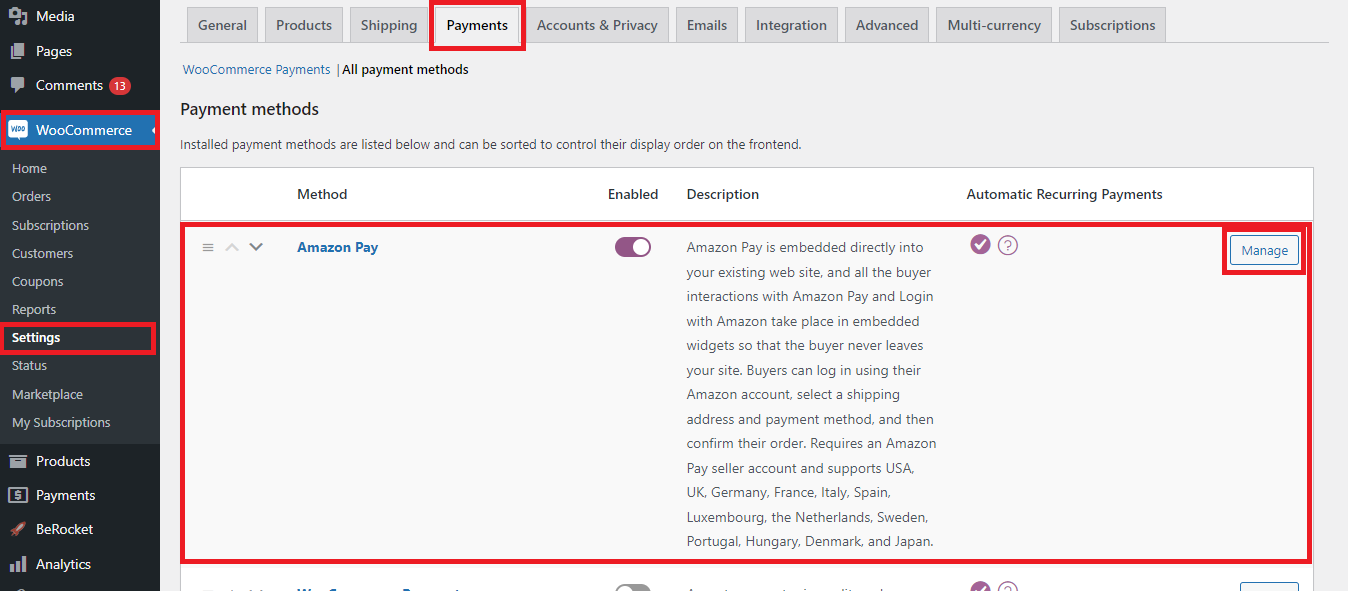
Go to WooCommerce > Settings > Payments. You'll see a new option called Amazon Pay with an Enable/Disable toggle and the Set up button. Feel free to switch the toggle to enable/disable Amazon Payments.

Click on the Set up button. The system will automatically redirect you to a new page for you to define some necessary information related to your online business.
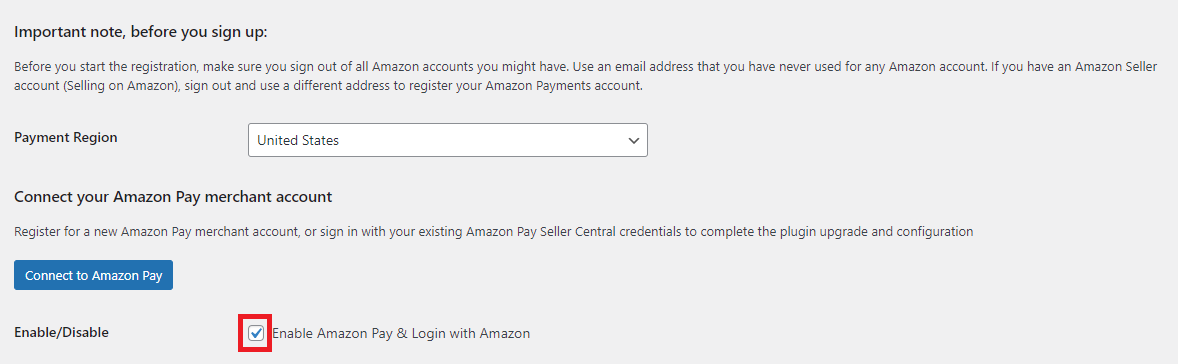
First, select your location in the Payment Region dropdown menu. Then, click on the Connect to Amazon Pay button to go to the Amazon Pay Seller signup screen.

On the new page, you'll be asked to provide your business name, website URL, business type, business address, tax ID number, tax mailing address, payment information, etc.

Once you're at the Tech Integration tab, type in the domain you'll use and your online store's privacy policy page.

Finally, once you've gone through the process, you'll be able to transfer your Amazon Payments credentials to your WooCommerce store by clicking on the Transfer access keys button.

If you navigate back to the Amazon Payments setup page on your WooCommerce store, you should see the fields in the picture being filled in:

Finally, tick the Enable Amazon Pay & Login with Amazon checkbox and then save changes.
Do a Test Transaction
Now, let's make a test transaction with Amazon Payments to see if it works properly. Go to WooCommerce > Settings > Payments. Click on the Manage button in the Amazon Pay option.
After that, choose the Yes option in the Use Sandbox dropdown menu. Remember to save changes when you're done.

Next, go to your Amazon Seller Central dashboard. Log in if necessary. From the Marketplace Switcher dropdown menu in the right of the menu bar, select Amazon Pay (Sandbox View).

Then, click on the create test buyer accounts text to create a test account.

Type in your name, email address, new password, and choose what test shipping addresses will be shown.

Pro tip: You can just add the append '-sandbox' to your regular email address. No need to create a new one. For example, if your email is 'example@yourdomain.com', you can create a sandbox account with the 'example-sandbox@yourdomain.com' email.
When you're done, scroll down to the bottom and click on the Create account button.
Next, go to your WooCommerce store and add any product to your cart. On the Cart page, click on the Amazon Pay button. Then sign in using your test account's email address and password.

On the Checkout page, select an address and click the Place Order button.

Finally, go to the Orders page in the WordPress dashboard and see if the order is processed correctly.
Start Accepting Real Transactions
If everything is fine, update the Use sandbox setting to No to start accepting transactions on your WooCommerce store.
If you want to test using a live transaction, we recommend asking your friend to make a transaction on your online store using their Amazon account. WooCommerce Amazon Payments doesn't allow the same account to be used to pay and accept payments.
Final Words
In conclusion, Amazon Payments is one of the most popular and trusted payment methods by online shoppers.
Using WooCommerce Amazon Payments as one of your payment gateways on your online store will definitely result in a better shopping experience for your customers. And as a side result, it'll bring more profit for your business in the long run.
Therefore, we hope this article has helped you gain a deeper understanding of the Amazon Pay WooCommerce payment gateway.

![]()
